What's in this module
- 01What an allotment actually is
- 02The honest truth about year one
- 03Your first visit to the plot — what to do
- 04How to read your plot
- 05Tools you actually need (and what to skip)
- 06What you can realistically grow in year one
- 07The mindset shift
- 08Allotment culture — the unwritten rules
- 09The five mistakes every beginner makes
- 10Your first 30 days — a practical plan
Right. So you've got yourself an allotment. Or you're seriously thinking about getting one. Either way — brilliant. Genuinely, properly brilliant. You're going to love this.
I remember standing on my plot for the first time and just… looking at it. Weeds taller than me. Soil I couldn't tell from clay. Half of it clearly hadn't been touched in years. I had no idea where to start. And I'll be honest — I stood there for a good ten minutes before I did anything, cuz it was that overwhelming.
But here's the thing. That feeling — that "where do I even begin" feeling — is completely normal. Every single person who's ever grown anything on an allotment started exactly there. And the growers you see now with beautiful, productive plots? They had their "where do I even begin" moment too. They just kept going.
This module is going to give you everything I wish I'd known on day one. Not just the theory — the actual, practical stuff. What to bring on your first visit. How to look at your soil and know what you've got. Which tools you actually need and which ones will just take up shed space. The mistakes everyone makes and how to skip them. And a proper plan for your first thirty days so you're never standing there wondering what to do next.
Let's get into it.
What Is an Allotment, Really?
An allotment is a plot of land — usually rented from your local council or a private association — that you use to grow your own food. Fruit, vegetables, herbs. That's it. Simple as that.
They've been around since the Victorian era, originally to give working-class families access to land so they could grow their own food. During the Second World War there were over a million and a half of them across the UK. These days there are around 300,000 — and waiting lists in most cities, which tells you something about how popular they're becoming again.
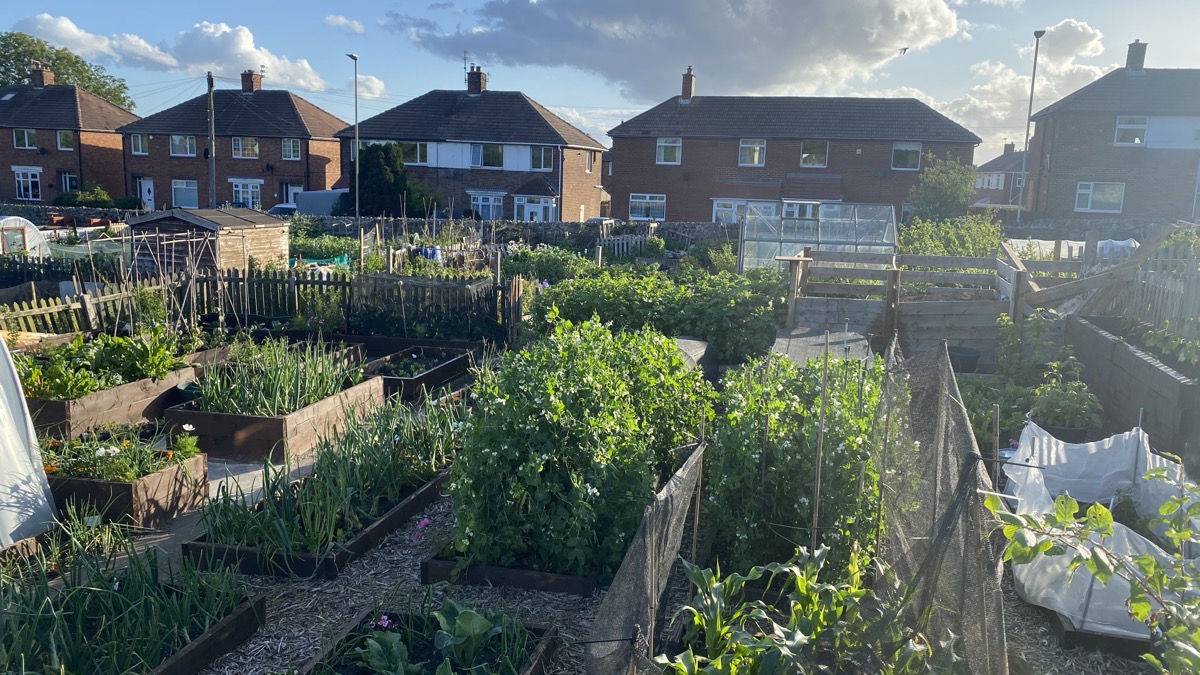
Most plots are somewhere between 250 and 300 square metres — roughly the size of a tennis court. That's actually a lot of growing space. More than most people realise until they're standing on it thinking "right, how am I going to manage all this?" Half-plots are increasingly common, and for a first-year grower they're often the smarter choice.
Your rent is paid to the site — council-run or private — and in return you get your plot plus access to shared water points, and sometimes shared equipment like a rotovator. What you do with the plot is largely up to you, within a few basic rules (no building permanent structures without permission, no livestock usually, keep it reasonably tidy, grow something).
If your site offers half-plots, seriously consider starting with one. A full plot in year one is a bloody big commitment — especially when everything is new and you're still working out what you're doing. A half-plot still gives you loads of space to grow a wide range of things, and you can always take on the full plot or a neighbouring one once you've found your feet.
I've seen people take on full plots with loads of ambition and then hand them back six months later cuz it was too much. Start manageable. Build from there.
Now — and this matters — an allotment is not a competition. Walk down any site and you'll see everything from immaculate, show-ready plots to ones that are, generously speaking, works in progress. Both are fine. Both belong. The person with the weedy plot might have had a difficult year. The person with the perfect plot might have been doing it for twenty years. Neither of those things is your business or your measure.
Your job is to grow things you want to eat, enjoy being outside, and learn your piece of ground. That's the whole job.
From day one, make a commitment to ignore what everyone else's plot looks like. Your only comparison should be where your own plot was last month vs. where it is now. That's the only measure that matters.
The Honest Truth About Year One
Right, I'm going to be straight with you here, cuz I think it matters more than anything else in this module. Year one is not going to be perfect. It probably won't look like the pictures on Instagram or the videos on YouTube. You will have weeds where you wanted courgettes. You'll lose things to slugs. At some point you'll look at your plot on a drizzly Tuesday and wonder what on earth you're doing.
None of that means you're doing it wrong. It means you're gardening.
"My first year I grew more weeds than anything else. But I also grew confidence — and honestly, that's what set up every single season after it."— Tony
Year one is really about getting to know your plot — how it drains when it rains, where the sun sits in the afternoon, what the soil actually feels like, which direction the wind comes from in winter. That's knowledge you can't get from a book or a course. You earn it by being there. And the beauty of it is, that knowledge makes every year after year one noticeably easier.
So here's what I'd say your year one goals actually are — and they're not what most people think going in.
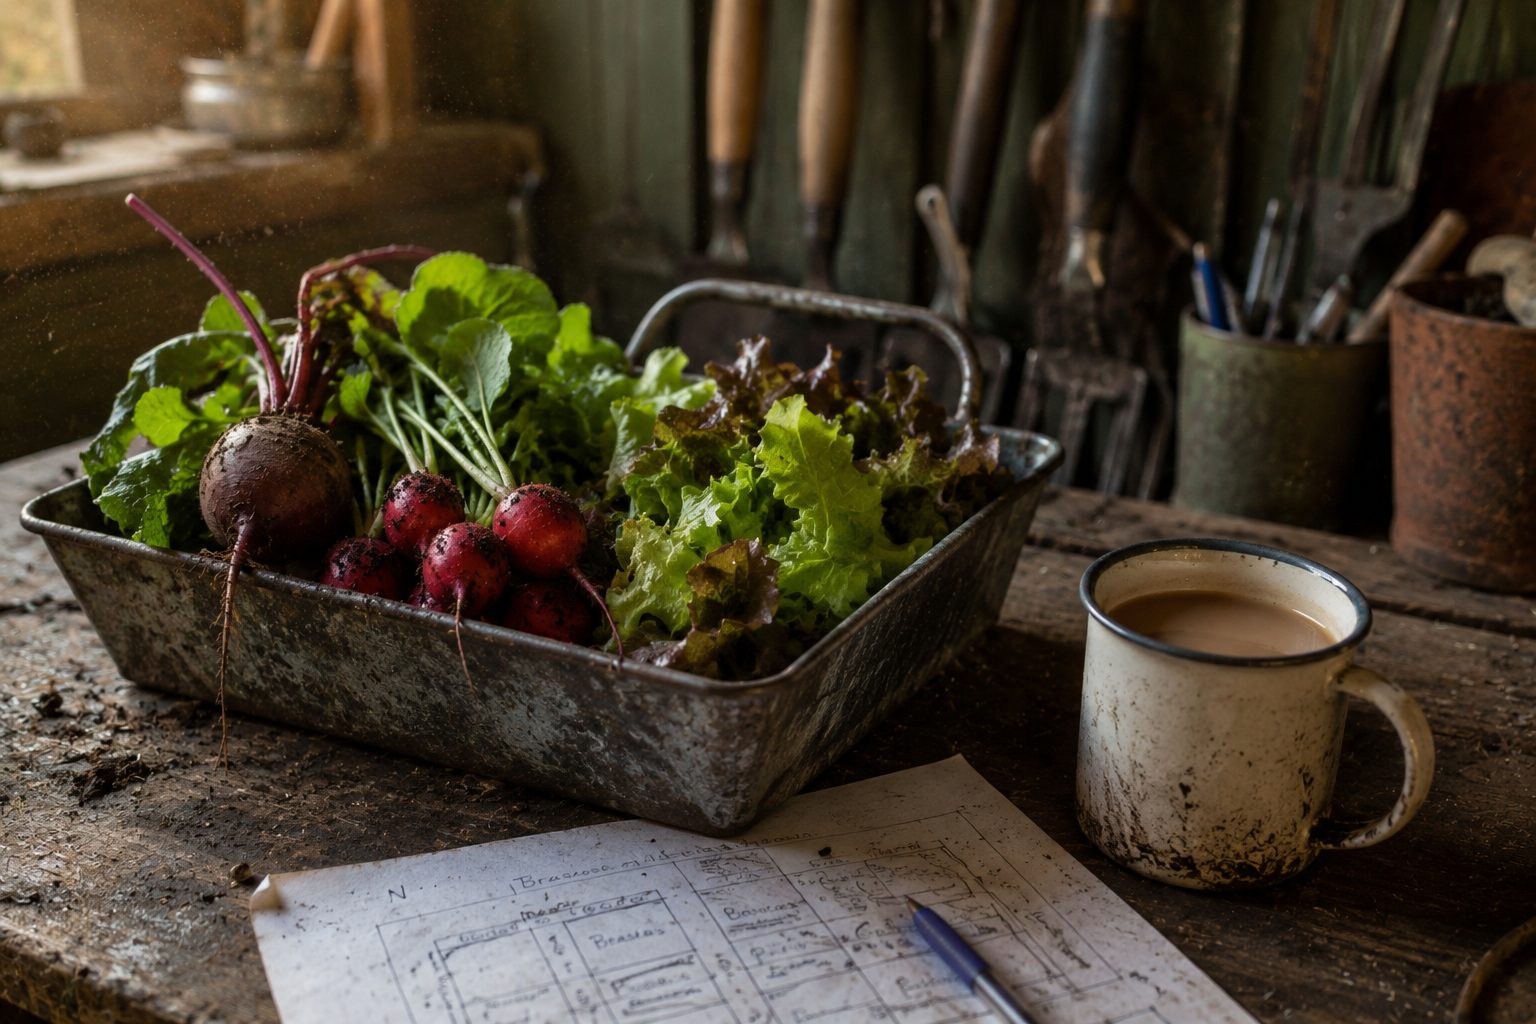
My first proper harvest on the allotment was a courgette. One courgette. I'd grown a few lettuces and pulled some radishes before that, but this felt different — this was something I'd grown from a tiny seed in a little pot on a windowsill, hardened off, planted out, looked after for weeks, and there it was.
I took it home, sliced it up, fried it in a bit of butter and garlic, and ate it on its own stood at the kitchen counter. And I thought — right. That's it. That's why people do this.
That courgette. One courgette. Keep that image in mind on the hard days, cuz that feeling is exactly what's waiting for you.
Slugs will get something. Blight might arrive. A late frost might catch you out when you put things out too early. Birds will help themselves. Something will bolt before you get to harvest it.
I've had all of it — and I've been growing on my allotment for years. The trick is to not take losses personally. Plants aren't obedient and neither is the weather. Accept the losses, learn what you can from them, and move on. Like I say — it might just be bloody me sometimes. But usually it's just gardening.
Go in with curiosity instead of expectation. Ask questions of your plot neighbours — they're usually brilliant and love sharing what they know. Observe more than you plan. And celebrate every single harvest like it's a proper triumph. Because it genuinely is.
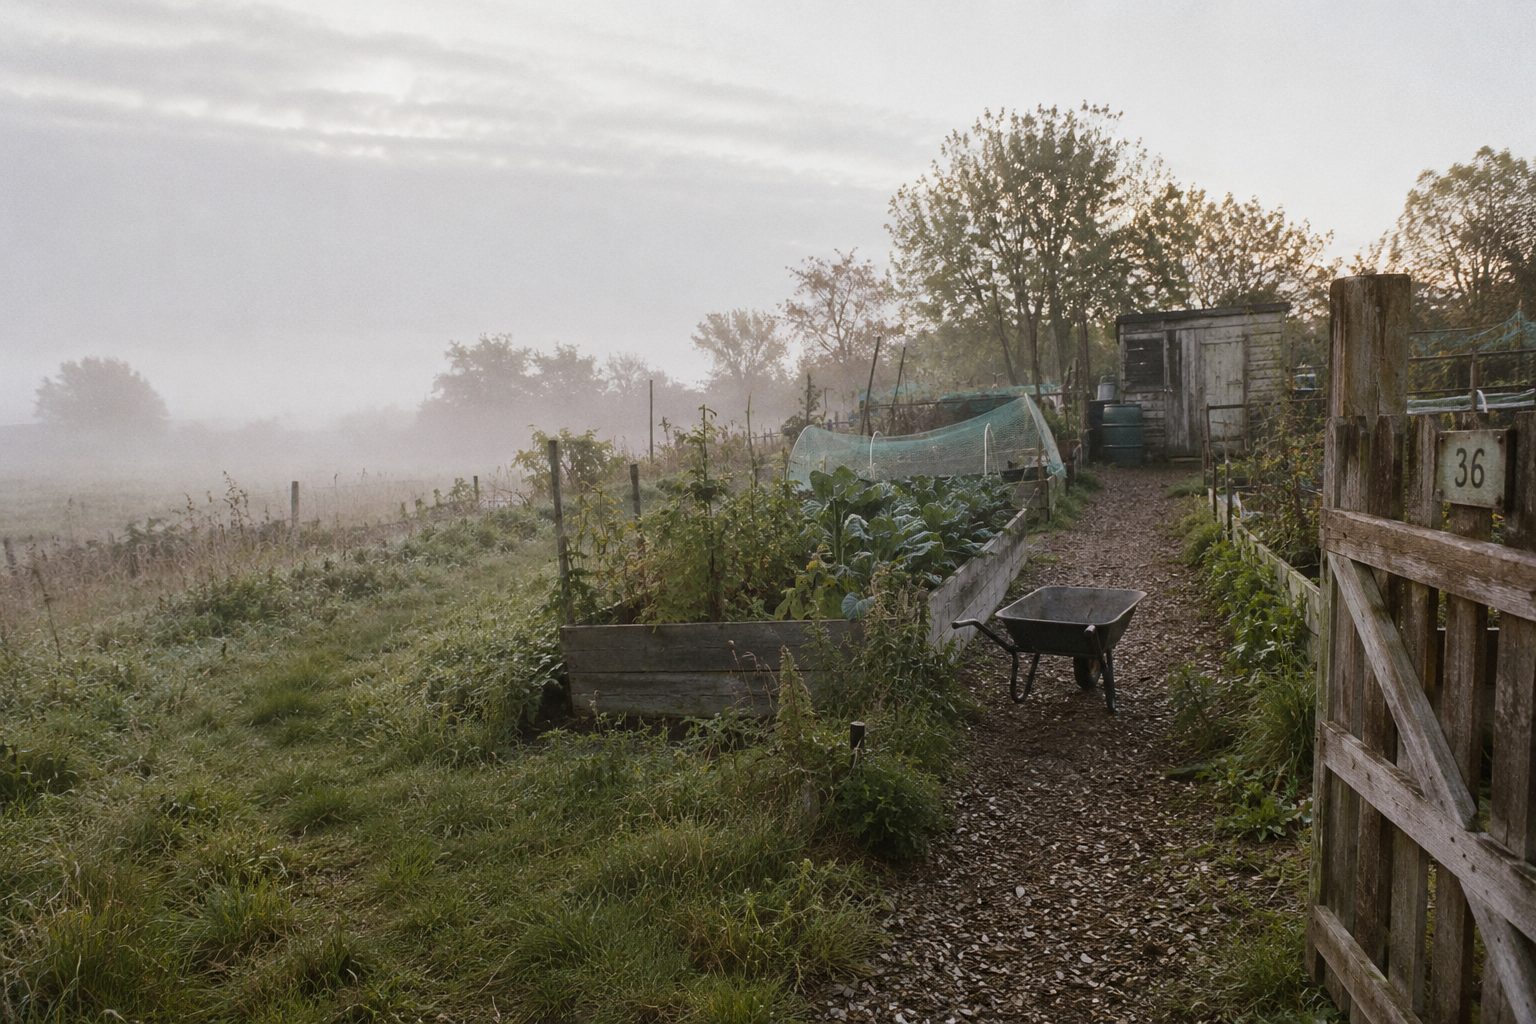
Your First Visit to the Plot — What to Actually Do
The moment you get the keys (or the gate code, or the handshake — it varies) you're going to want to get up there. Brilliant. But don't just turn up empty-handed with no plan. Here's exactly what to bring and what to do on that first proper visit.
What to bring
Stout boots or wellies. Gloves — proper gloves, not gardening fashion gloves. An old coat. A trowel or small fork if you have one. A notepad or just your phone. A tape measure is handy. And a flask of tea, cuz you're going to be out there a while and it's always worth it.
Don't bring loads of tools on your first visit. You're not doing any major work yet — you're assessing. Getting familiar. That's the job today.
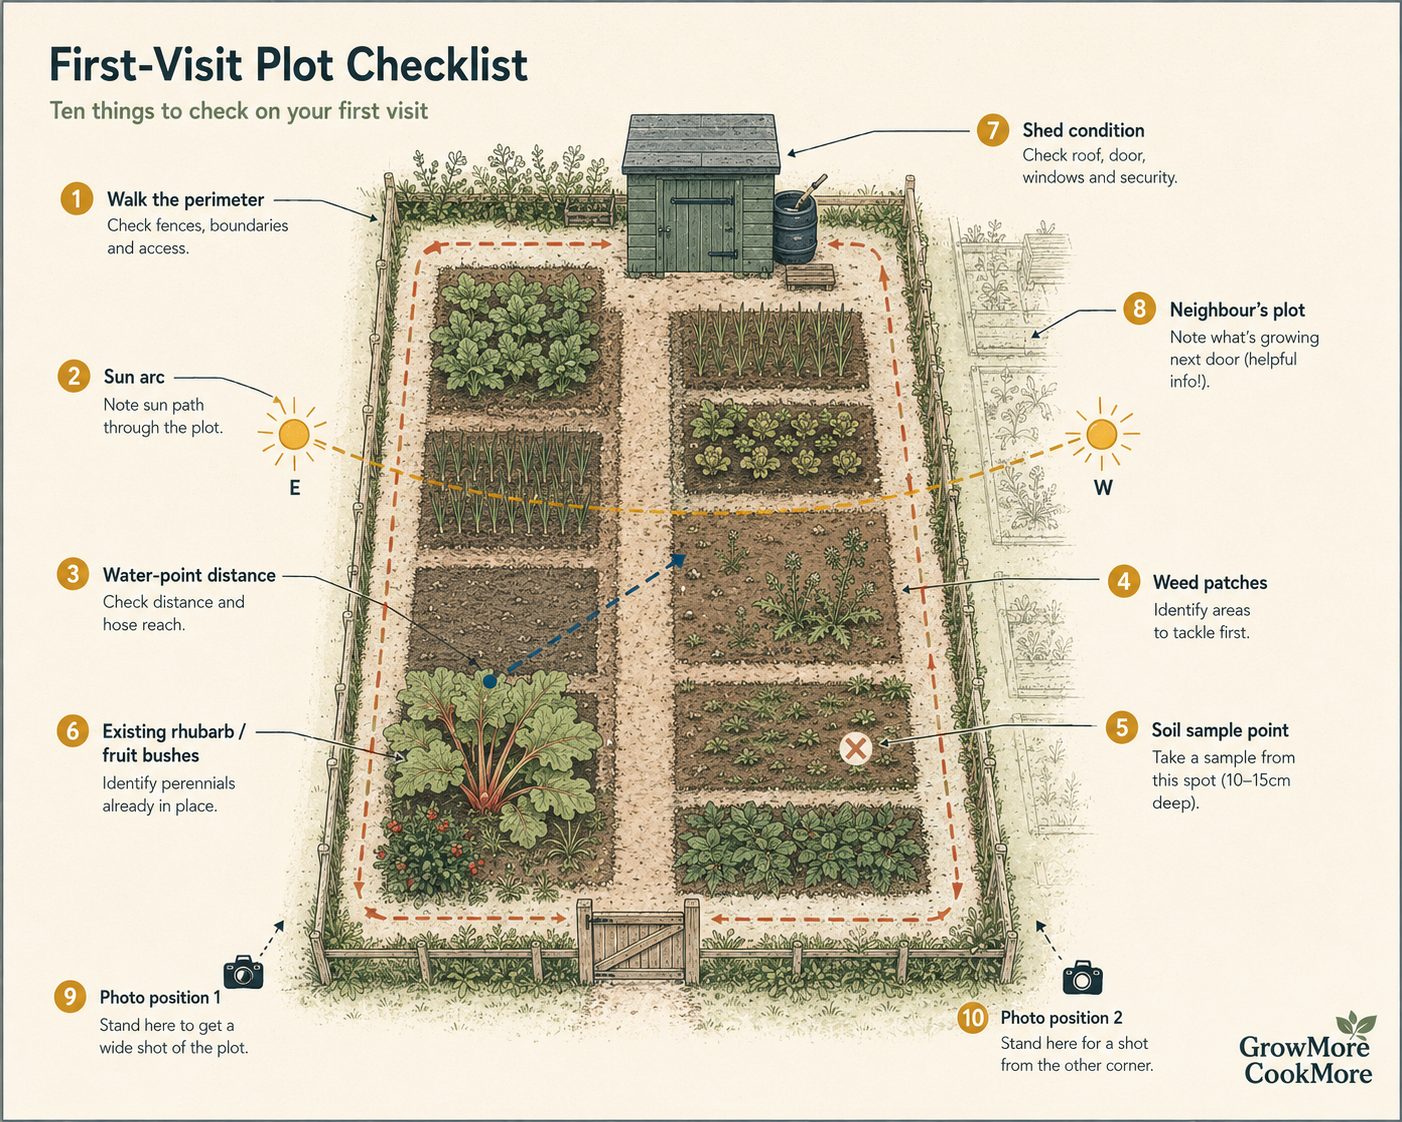
Your first visit checklist
First Visit — What to Check and Do
- Walk the full perimeter of your plot — get a feel for the size and shape
- Note where the sun hits and where it doesn't — which bits get the most light?
- Check where the water point is and how far it is from your plot
- Feel the soil — is it hard and compacted? Soft? Sandy? Sticky and clay-like?
- Look for any existing beds, paths, or structures worth keeping
- Identify the worst weed patches — you'll want to deal with these first
- Look for any perennials that might be worth saving (rhubarb, fruit bushes, herbs)
- Check if there's a shed or any storage — and what state it's in
- Introduce yourself to whoever's nearby — your neighbours are a brilliant resource
- Take photos — you'll want to look back at these in six months
That last one — taking photos — is something I really wish someone had told me when I started. Take photos on your first visit. Take them every month. Because six months in, you'll look back at where you started and feel incredibly chuffed at how far you've come. Even when it feels like nothing's going right, the photos don't lie.
It's really tempting to grab a spade and start digging the minute you arrive. I get it — you're excited. But your first visit should be about looking and listening, not doing. Assess before you act. You'll make much better decisions about where to start if you've walked the whole plot first and thought about what's what.
If you do want to do something — pull a few big weeds. Get your hands in the soil. But save the heavy work for visit two, when you've got a plan.
How to Read Your Plot
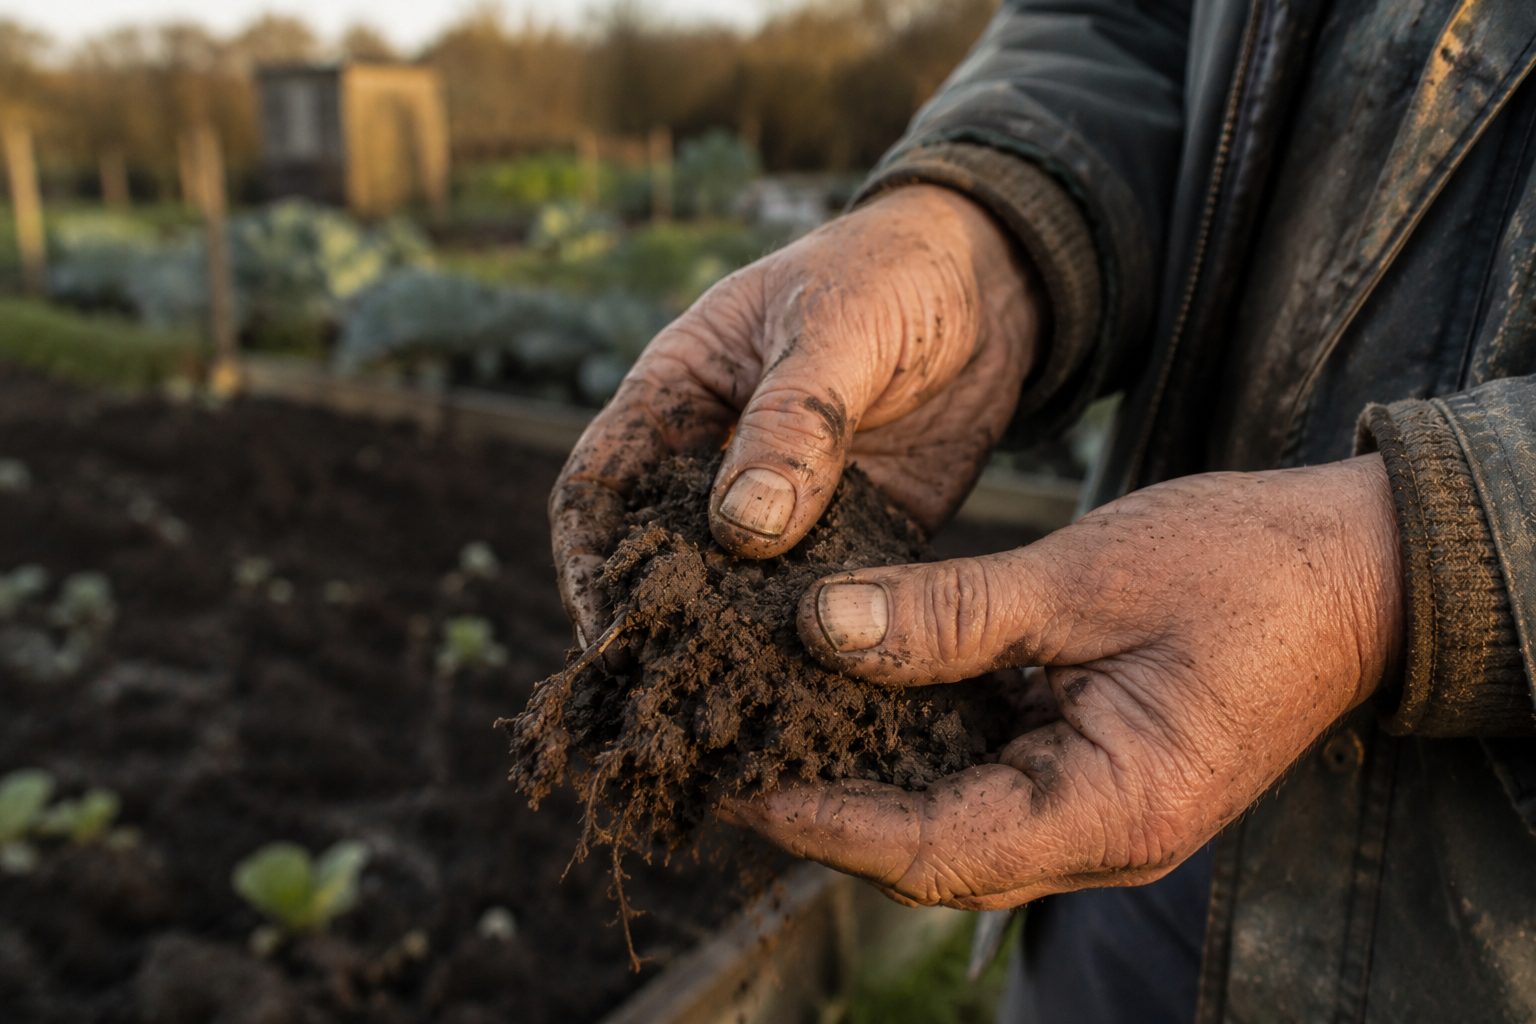
This is one of the most underrated skills in allotment growing — and barely anyone talks about it properly. Learning to "read" your plot means being able to look at it and understand what it's telling you about the soil, the drainage, the light, and what's likely to grow well where.
You don't need a soil testing kit to do this (though they're useful, and cheap, and worth getting eventually). You can learn an enormous amount just by looking and feeling. Here's what to look for.
Five soil tests you can do with your hands
The squeeze test — is it clay?
Take a handful of damp soil and squeeze it into a ball. If it holds its shape and feels smooth and sticky, you've got a clay-heavy soil. Clay holds nutrients and moisture well but drains slowly and gets waterlogged in winter. Needs lots of organic matter added over time.
What to do: add compost and grit. Don't dig when very wet — it destroys the structure.
The crumble test — is it sandy?
Squeeze the ball again and let it go. If it falls apart immediately and feels gritty, it's sandy. Sandy soil drains fast — sometimes too fast — and doesn't hold nutrients as well as you'd like. But it warms up quickly in spring and is easy to work.
What to do: add lots of organic matter to improve moisture retention. Water more frequently in dry spells.
The colour test — how dark is it?
Good, healthy, fertile soil tends to be darker — rich brown or even nearly black. Dark colour usually means good organic matter content. Pale, grey, or yellowish soil often indicates poor fertility or waterlogging. Very red soil usually means high iron content.
What to do: if it's pale, prioritise adding compost and manure to build fertility over time.
The worm test — is there life in it?
Dig a small area about 30cm deep and count the worms. Worms are a brilliant indicator of soil health — they aerate the soil, break down organic matter, and their castings are incredibly fertile. A healthy soil should have plenty. No worms? The soil needs serious work.
What to do: add organic matter, stop compacting it, and the worms will come. They find the food.
The puddle test — how does it drain?
Pour a bucket of water on the soil and watch how quickly it drains. If it disappears in a few minutes, drainage is good. If it sits on the surface for a long time, you've got a drainage problem — either from compaction, clay, or a high water table. Standing water in winter is a serious issue for most crops.
What to do: raised beds, adding grit, and improving organic matter all help with drainage over time.
Reading the weeds — yes, really
This sounds daft, but the weeds on your plot actually tell you something useful. Different weeds thrive in different soil conditions, and learning to read them gives you free information.
Nettles and docks — usually a sign of fertile, nitrogen-rich soil. Good news, actually — it means organic matter has been added or left there before. Where nettles grow happily, veg often will too.
Moss and rushes — wet, poorly drained or acidic soil. Worth addressing the drainage before planting here.
Fat hen and chickweed — often indicates disturbed, fertile soil. Not a bad thing at all.
Couch grass and bindweed — the ones you need to sort out properly. Both spread aggressively underground and will come back if you just chop the tops. You need to get the roots out. Patient, thorough digging — or the no-dig method covered in Module 2 — is your friend here.
Tools You Actually Need — and What to Skip
Here's something that catches almost every new grower out — they go to the garden centre in a burst of enthusiasm and spend a fortune on tools they don't need. Or they buy cheap tools that break after two uses and put them off the whole thing.
I'm going to be straight with you about what you genuinely need, what's nice to have later, and what's a complete waste of money.
- Spade — full-sized, good quality, buy once
- Fork — for breaking up soil and lifting root veg
- Hoe — for weeding between rows (a must)
- Hand trowel — for planting and close work
- Watering can — two if your water point is far
- Kneeling pad or old mat
- Good gloves — not fashion ones
- Twine or string for marking out rows
- Plant labels and a marker pen
- Rake — for levelling and seed beds
- Hand fork — useful in tight spaces
- Dibber — for planting out seedlings
- Wheelbarrow — essential once you're composting
- Hosepipe (if allowed on site)
- Cold frame for hardening off
- Soil thermometer
- pH testing kit (cheap, very useful)
- Electric rotovator — hire one if you need it
- Fancy ergonomic tools — regular ones work fine
- All-in-one gadget tools — they're always rubbish
- Loads of netting before you know what you need
- Grow lights — not needed for an allotment
- Mini greenhouse until you know your space
- Expensive raised bed kits — make your own cheaper
The most important tools to spend money on are your spade and fork. These are the tools you'll use on literally every allotment visit. A decent stainless steel spade from a proper hardware shop or garden centre will last you twenty years. A cheap one from a discount shop will bend, rust, or snap inside a season.
For everything else — especially starting out — second-hand is brilliant. Check local Facebook Marketplace, car boots, or ask on your allotment site. Experienced growers often have spare tools sitting in sheds they'd happily give away or sell for a couple of quid. Don't be embarrassed to ask.
Most beginners underuse the hoe and overuse the trowel. A good hoe — drawn lightly across the surface on a dry day — kills weed seedlings before they get established and takes a fraction of the time of hand-weeding. Get into the habit of hoeing between rows every week or two and you'll massively reduce your weeding workload. Little and often, man. That's the trick with weeds.
What Can You Realistically Grow in Year One?
More than you'd think — genuinely. But the key is choosing crops that are forgiving, that don't need perfect soil or perfect conditions, and that give you something back reasonably quickly so you stay motivated. This is important. Year one is not the year to try and grow everything. It's the year to grow a handful of things really well and build your confidence.
Here's how I'd break it down. Start with the near-certain wins, add a couple from the "worth a go" column if you fancy, and leave the tricky stuff for year two when you know your plot better.
- Potatoes
- Courgettes
- French Beans
- Lettuce & Salad Leaves
- Radishes
- Beetroot
- Garlic (plant autumn)
- Peas
- Chard & Perpetual Spinach
- Spring Onions
- Tomatoes (with care)
- Broad Beans
- Onions (from sets)
- Squash & Pumpkins
- Climbing Beans
- Kale
- Spinach
- Rocket
- Parsnips
- Cauliflower
- Celeriac
- Celery
- Leeks (from seed)
- Brussels Sprouts
- Asparagus (3-year wait)
Notice that the near-certain wins are the things that grow fast, taste great fresh, and don't need perfect conditions. Potatoes practically grow themselves and they do a brilliant job of breaking up new ground at the same time. Courgettes are almost embarrassingly productive once they get going — your neighbours will stop accepting them by August, trust me. And salad crops like lettuce and rocket can be going in containers even before you've got the main beds sorted.
Your quick wins — how fast can you get something in the bowl?
Radishes are ready in about four weeks. Lettuce and rocket in five or six. You can literally be harvesting your first food from the allotment within a month of taking it on — even if the rest of the plot is still in a state. Get a small patch of salad crops in immediately. Not because they're the most impressive thing you'll grow, but because harvesting something early in year one is incredibly motivating. Bish bash bosh — something in the bowl.
The Mindset Shift
If you've been gardening at home — even if you're good at it — taking on an allotment needs a bit of a mental adjustment. The scale is different. The conditions are different. Your relationship with the space is different. And the way you need to think about time is completely different.
- One hour and it's sorted
- Mainly decorative — you're not relying on it for food
- Weeds are an annoyance you deal with occasionally
- Watering takes ten minutes
- You control the conditions more easily
- You can fix it on a weekend
- Scale demands planning and clear priorities
- You're producing food — that changes everything
- Weeds are a constant, managed process not a one-off job
- Watering is a proper ongoing commitment
- Weather and seasons drive what you do and when
- Little and often beats long occasional sessions
The biggest shift, if I'm honest, is learning to think in seasons rather than weekends. Your plot doesn't run on your schedule — it runs on the weather's schedule and the calendar's schedule. Some things you'll sow in autumn for spring. Some things need to be in the ground before April or there's no point. Getting your head around that seasonal rhythm is one of the most satisfying things about allotment growing, once it clicks.
The other thing — and I cannot stress this enough — is frequency over duration. Ten visits of an hour each will always beat two visits of five hours. Your plot needs regular attention, not occasional heroics. That's not just about the work — it's about noticing things. Spotting a pest problem before it gets out of hand. Catching a courgette before it turns into a marrow. Seeing that a seedling has come through and needs thinning. You only see those things if you're there regularly.
Ten one-hour visits a month will produce a better plot than two five-hour sessions. Aim to get up there three or four times a week, even if it's just for twenty minutes. Regular eyes on your crops is how you catch problems early, keep on top of weeds, and harvest things at the right time.
Allotment Culture — The Unwritten Rules
Every allotment site has its own character and its own community. And like any community, there are unwritten rules — things that aren't in the tenancy agreement but matter a lot for being a good neighbour and fitting in well. Here's what to know going in.
Say hello
Introduce yourself to your immediate neighbours. They'll often know the site inside out, know what works in that specific soil, and are usually delighted to welcome someone new. Don't be shy. A simple "I've just taken on plot X — I'm Tony" goes a long way.
Share surplus
When you've got more courgettes than you know what to do with — and you will — pass them over the fence. Sharing surplus is allotment culture at its best. People often leave boxes of spare seedlings or produce near the gate with a "help yourself" note. Take part in this. It's one of the nicest things about being there.
Keep your edges tidy
Your plot borders are shared. Weeds and grass that you leave long at the edges will seed into your neighbours' plots. Keep the edges trimmed. It's basic courtesy and it avoids falling out with the people you're going to be seeing every week for years.
Don't waste water
Water is shared. In dry spells it's in high demand. Don't leave a hose running unattended. Fill your cans and move on. Some sites have rules about hosepipe use in summer — know them and follow them without being told twice.
Don't compare or comment
Never comment on someone else's plot unless they've asked for your opinion. You don't know their circumstances. They might be dealing with illness, bereavement, work pressure, or a dozen other things that explain why the plot looks the way it does. Mind your own plot and let everyone else mind theirs.
Dogs on leads, kids supervised
If you bring a dog — and loads of people do, it's a lovely thing — keep it on a lead near other people's plots. Kids are wonderful on allotments but make sure they're not trampling beds or picking things without asking. A five-year-old who pulls someone's prize leeks is not going to make you popular.
In my first or second year, I had blight coming in on my tomatoes. I didn't recognise it for what it was — I thought the leaves were just getting a bit tatty. My neighbour on the next plot came over and said, very kindly, "I think that's blight, mate. You want to get those off now before it spreads to your potatoes."
I did. And my potatoes were fine. If she hadn't said anything, I'd have lost the lot.
That's allotment community. People look out for each other. The more you're part of it — the more you say hello, share a flask of tea, hand over spare seedlings — the more you get that support back. You know what I mean?
The Five Mistakes Every Beginner Makes
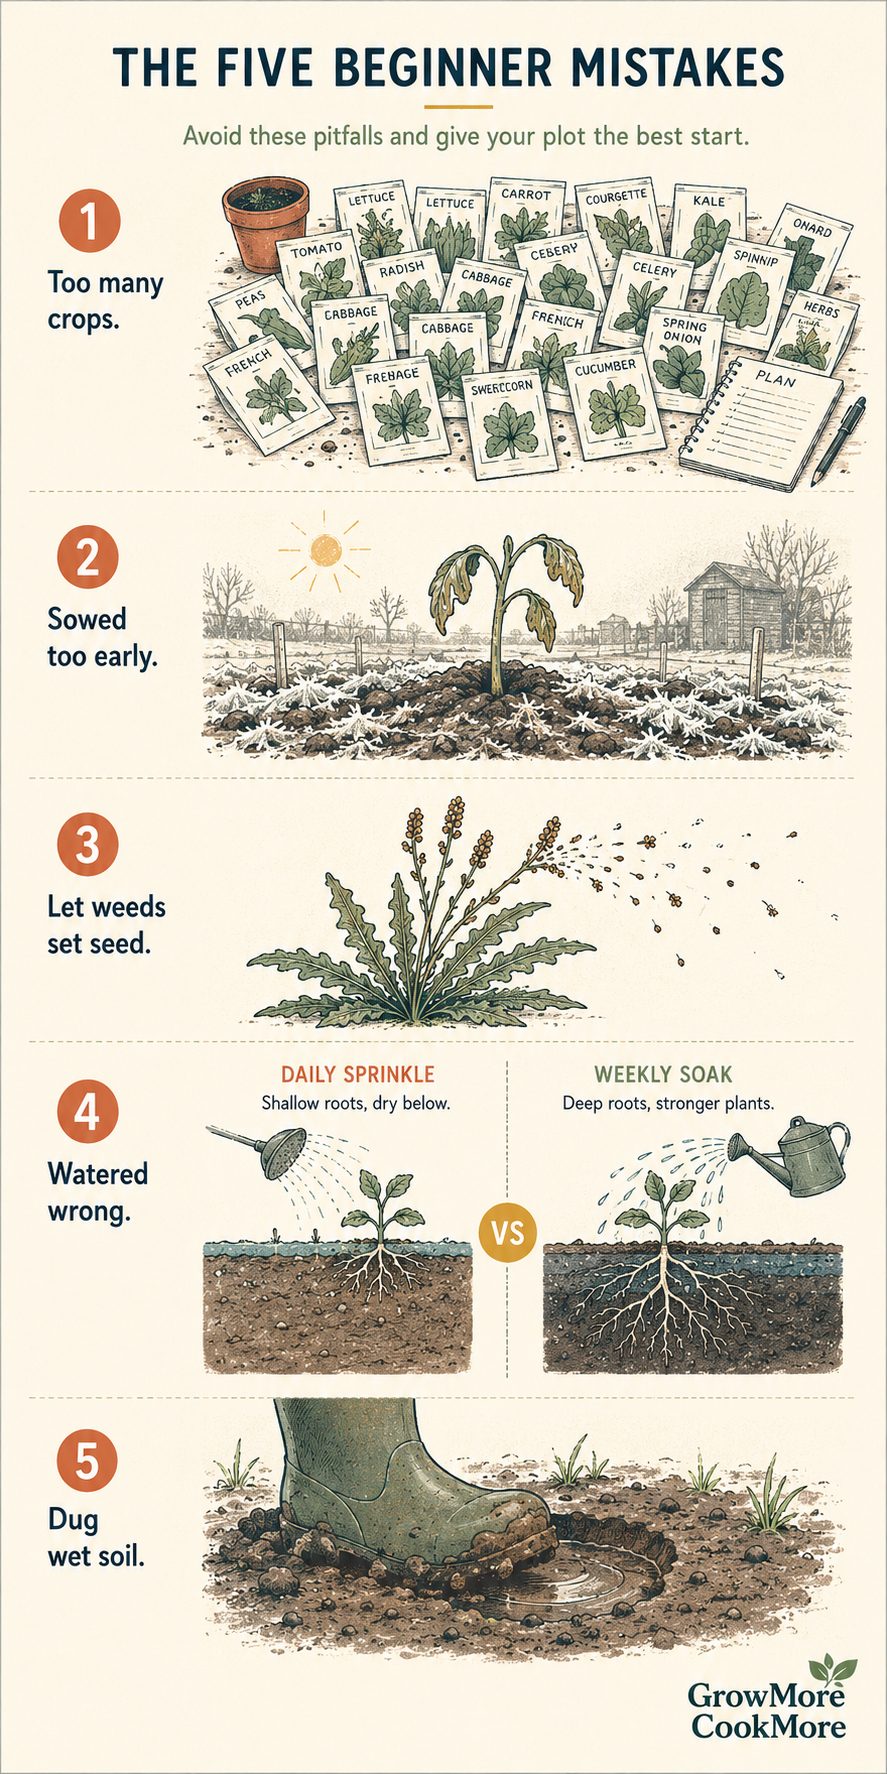
I'm not listing these to put you off — I'm listing them cuz if I'd known about these in advance, I'd have saved myself a lot of hassle. Most of them I made myself. All of them I see repeatedly on allotment sites. You can just… not do these. Simple as that.
The excitement of getting your first plot is real — and it makes you want to grow everything. You buy thirty different packets of seeds. You plan every inch of the plot. You get completely overwhelmed by June and end up doing nothing properly.
This is the number one mistake I see new growers make. I've done it myself. You end up with small amounts of everything and large amounts of nothing.
The first warm day in March is dangerously exciting. The sun's out, the birds are singing, and everything in you says "plant everything now." So you put your tomatoes out. Your courgettes. Your beans. And then the weather — as it always does — turns. You get a frost in late April and lose the lot.
This is heartbreaking when it happens. And it happens to beginners almost every year.
There's an old saying: "One year's seeds, seven years' weeds." It's not entirely scientifically accurate but the principle is completely right. If you let one dock plant or one fat hen seed, you'll be dealing with the offspring for years. Literally years.
The most common version of this mistake is leaving a weedy patch thinking "I'll deal with that next weekend" — and then it sets seed while you're busy.
Most people's instinct is to water their crops every day with a small amount of water. It feels conscientious. It feels like you're looking after things. But it actually trains roots to grow toward the surface — which makes plants weaker and more vulnerable to dry spells.
The allotment equivalent of this is watering for two minutes every day instead of a proper deep soak every few days.
In your enthusiasm to get started, you might find yourself digging heavy or clay soil after rain when it's completely waterlogged. It feels like you're making progress. You're not — you're actually destroying the soil structure. Wet clay compressed under a boot or spade creates a hard pan that water can't penetrate and roots can't push through. It can take years to fix.
Your First 30 Days — A Practical Plan
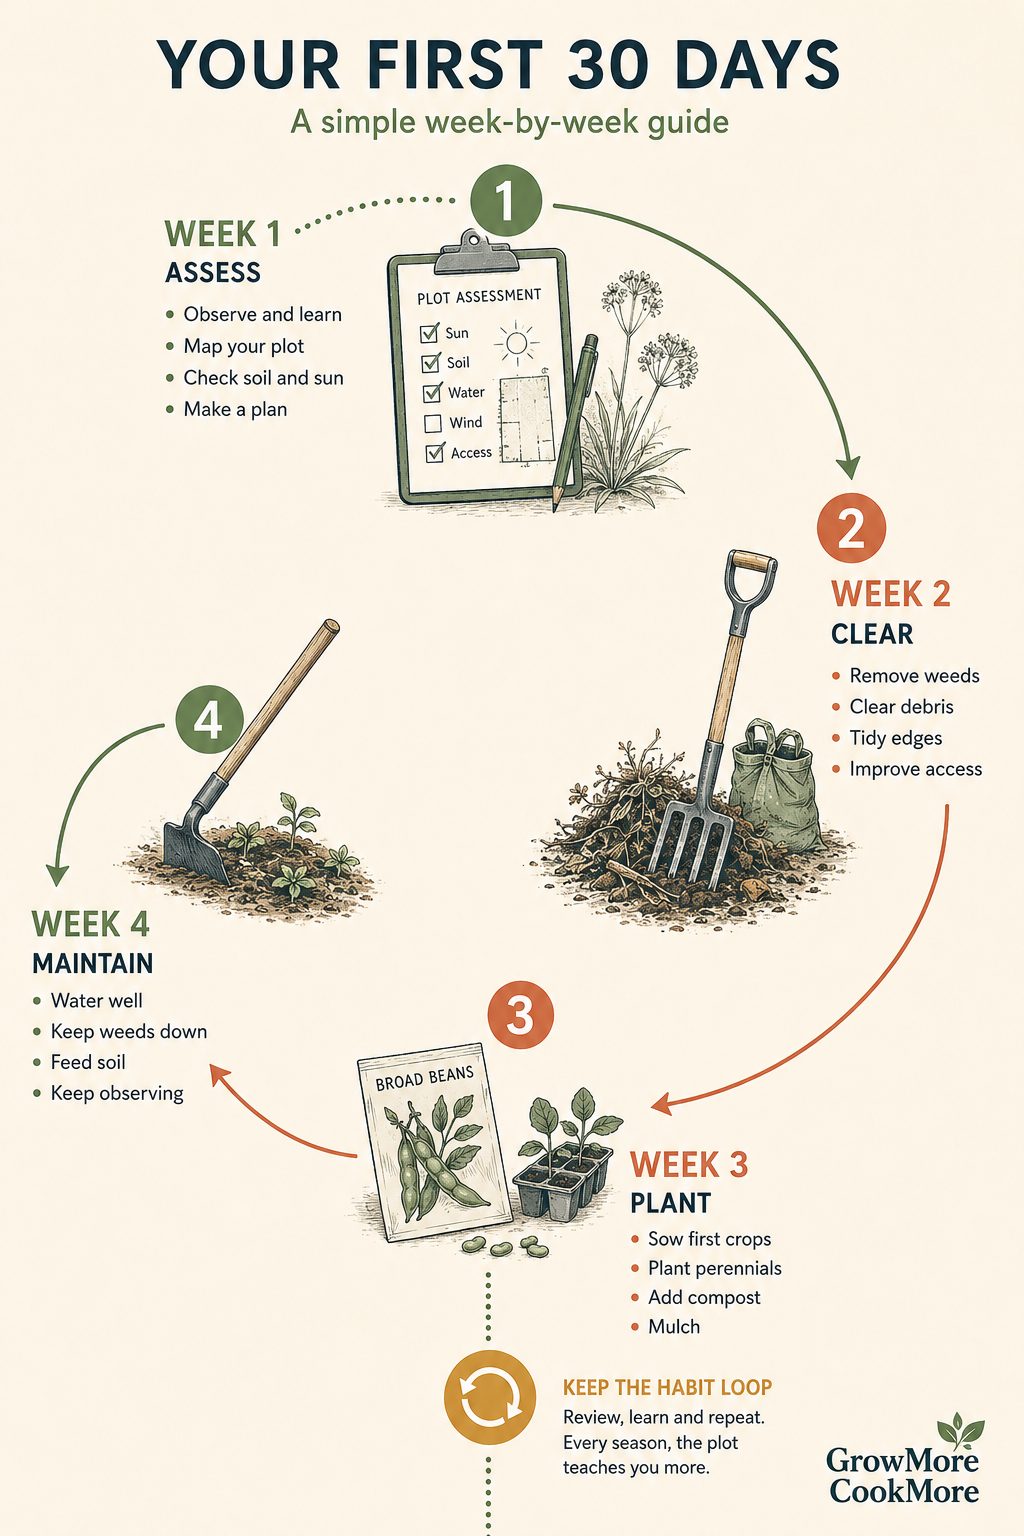
Right. Here's something concrete. A lot of new plot holders feel paralysed because there's so much to do and they don't know what order to do it in. This plan takes that uncertainty away. Follow this and you'll end your first month with a clear, productive plot and genuine momentum.
This assumes you're starting in spring — but the principles apply any time of year, you'd just adjust what you're sowing.
Week 1 — Assess & Plan
- Do your first proper visit with your checklist (see Section 3)
- Take photos of the whole plot — you'll be glad you did
- Identify the best 2–3 areas for growing this season
- Chat to your neighbours — introduce yourself, ask what grows well there
- Make a simple sketch of the plot and note what you want where
- Buy or gather the tools you actually need
Week 2 — Clear & Prepare
- Clear your first priority growing area — remove weeds, roots and all where possible
- If soil is workable, dig or fork it over and break up any clumps
- Add compost or well-rotted manure if you have it — even a thin layer helps
- Mark out your beds with string lines
- Sow your first quick crops — radishes and salad leaves can go in now
- Order or buy any seeds you still need
Week 3 — Plant & Protect
- Continue clearing the next section of the plot
- Plant out anything you've started indoors (if frost risk has passed)
- Set up any supports — bean canes, pea netting — before you need them
- Put protection in place: netting over brassicas, slug traps or barriers
- Check on your first sowing — thin out if seedlings are too crowded
- Water your first sowing if it hasn't rained
Week 4 — Maintain & Sow More
- First hoe between your rows — weeds will be appearing now
- Sow your second batch of salad leaves for succession (this keeps harvest coming)
- Check for pests — aphids, slugs, caterpillars
- Water deeply if the weather is dry
- Plan your next month's sowing schedule
- Take month-one photos and compare to the beginning — you've done a lot.
Ongoing — Build the Habit
- Aim to visit three or four times a week — even short visits count
- Hoe regularly — fifteen minutes of hoeing saves hours of hand-weeding
- Start a compost heap as soon as you have material for it
- Keep sowing in succession — don't let gaps appear in your growing plan
- Observe, note, and adjust — your plot will teach you if you let it
At the end of month one, your plot won't look perfect — and that's completely fine. The goal is momentum. One cleared bed, a row of radishes coming through, and a habit of getting up there regularly is a brilliant month one. Don't measure yourself against where you want to be. Measure yourself against where you started. That's your real progress.
Your Year One Promise
Five things to commit to before your first season. Tick them as yours to keep.
- I'll focus on learning my plot, not perfecting it. Year one is a discovery year.
- I'll pick five crops to grow properly — things I actually want to eat — and give them real attention.
- I'll get up there little and often — regular short visits beat occasional marathons.
- I'll talk to my neighbours. They know things I don't — and sharing that's what allotments are about.
- I won't compare my plot to anyone else's. Mine is mine — and it's going to be brilliant.
Look after yourselves. Take good care.
— Tony